
Source Guide: Constant Contact
This guide describes the process for configuring Constant Contact to send DMARC-compliant email. You will need to configure this source, and others that send on your behalf, before advancing your DMARC policies to a more restrictive state, e.g., quarantine and/or reject.
To bring this source into DMARC compliance, you will need access to Constant Contact’s administrative account and the domain’s DNS management console.
From time to time, these instructions change with very little advance notice. Please always refer to documentation hosted by Constant Contact for the most complete and accurate information.
General information
Constant Contact is an email marketing service provider designed for small businesses. It’s often used by marketing and sales departments. Constant Contact supports DMARC compliance through DKIM alignment for their customers.
DKIM
Constant Contact provides two options for enabling DKIM: authentication using CNAME records and authentication using a TXT record. Self-authentication using DKIM CNAME records is the simplest and most secure way to authenticate your domain address. It is also recommended as Constant Contact will manage key rotation for you.
To configure DKIM using CNAME records:
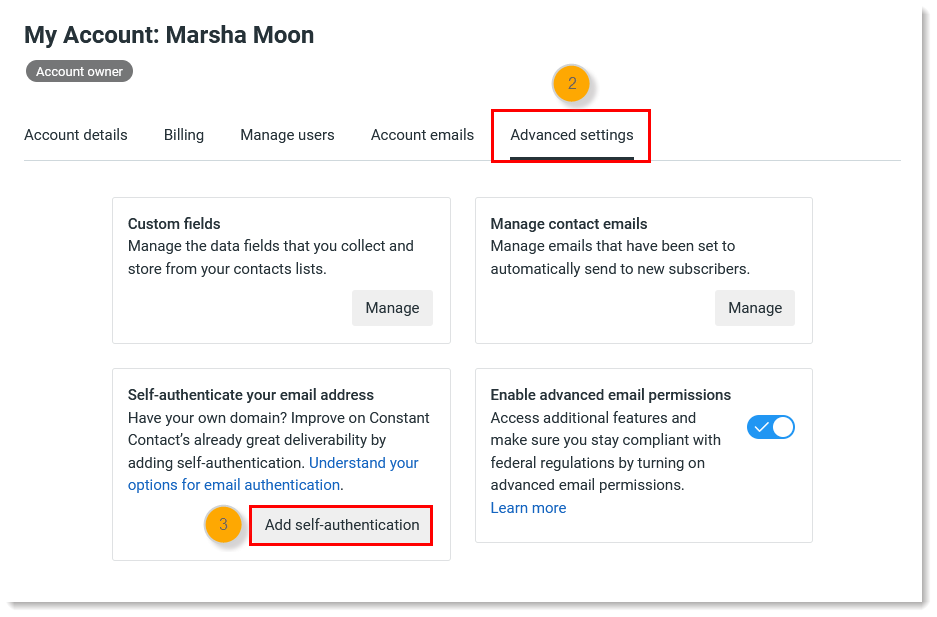
- Click the profile name in the upper-right of the Constant Contact console and select My Account.
- Click the Advanced settings tab.
- Click Add self-authentication.
- Select “Self-authenticate using DKIM CNAME records.”
- Click Continue.
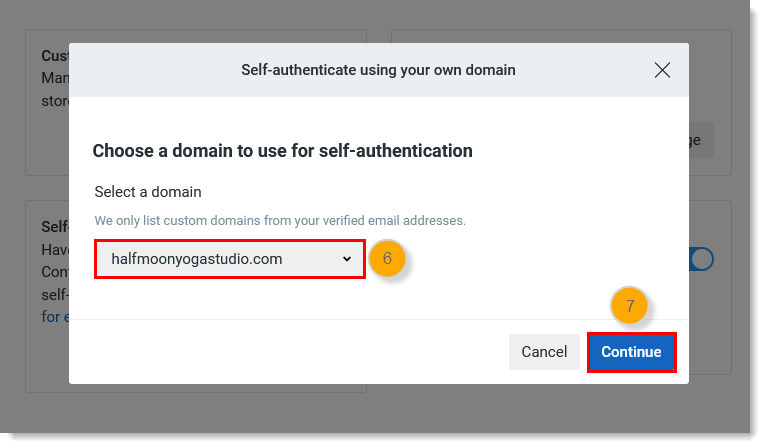
- From the drop-down, select the domain you want to use for self-authentication. If the custom domain you want to use isn’t listed, choose “Select another domain” from the drop-down to add and verify a new email address.
- Click Continue.
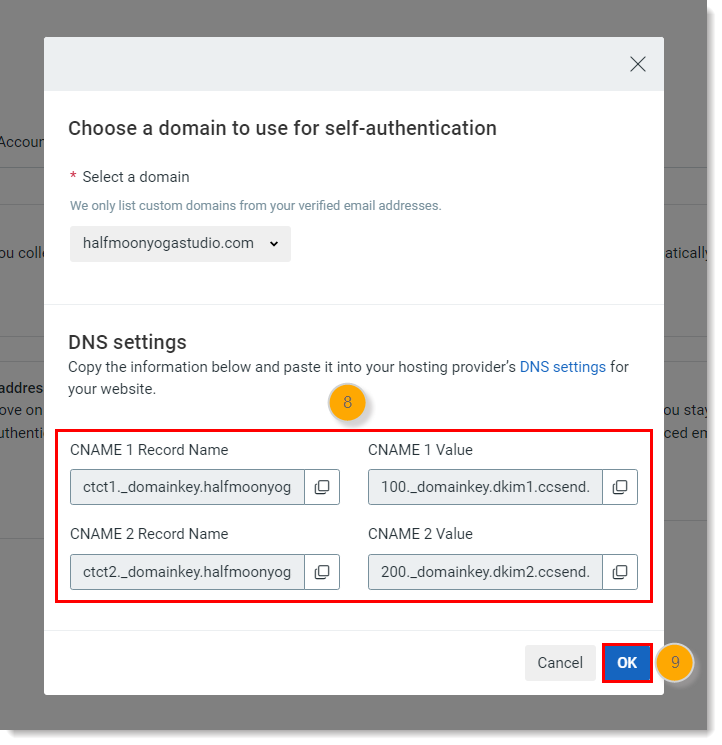
- Copy the CNAME record names and values to update your DNS records.
- Once you’re done, click OK.
- Click Got it.
- Click OK to return to your account.
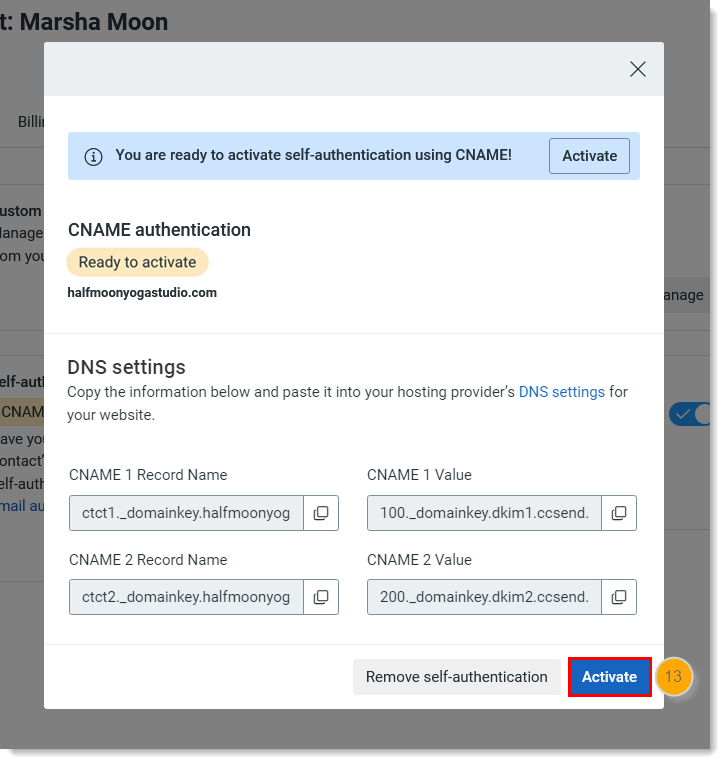
- 24-48 hours after you’ve pasted the CNAME records into your DNS settings, click Check status or Manage to finish activating your self-authentication.
- Click Activate.
Self-authenticate using a DKIM TXT record
When you self-publish for authentication using a DKIM TXT record, Constant Contact generates a public/private DKIM key pair for you. Constant Contact uses the private key to sign your outgoing emails, while you publish the public key in the DNS records for your domain. This option is best if you have multiple Constant Contact accounts using the same domain.
To configure the DKIM TXT record:
- Click the profile name in the upper-right and select My Account.
- Click the Advanced settings tab.
- Click Add self-authentication.
- Select “Self-authenticate using DKIM TXT record.”
- Click Continue.
- From the drop-down, select the domain you want to use for self-authentication. If the custom domain you want to use isn’t listed, choose “Select another domain” from the drop-down to add and verify a new email address.
- Click Continue.
- Click Generate key.
- Publish the DKIM key for the authentication records in your domain’s DNS entry wherever you manage your DNS records. Use the DKIM key to create a DNS TXT record, using the Hostname as the name of the TXT record and the TXT Record as the content of the TXT record. Click the copy symbols to copy the host name and TXT record.
- Once you’re done, click Ok.
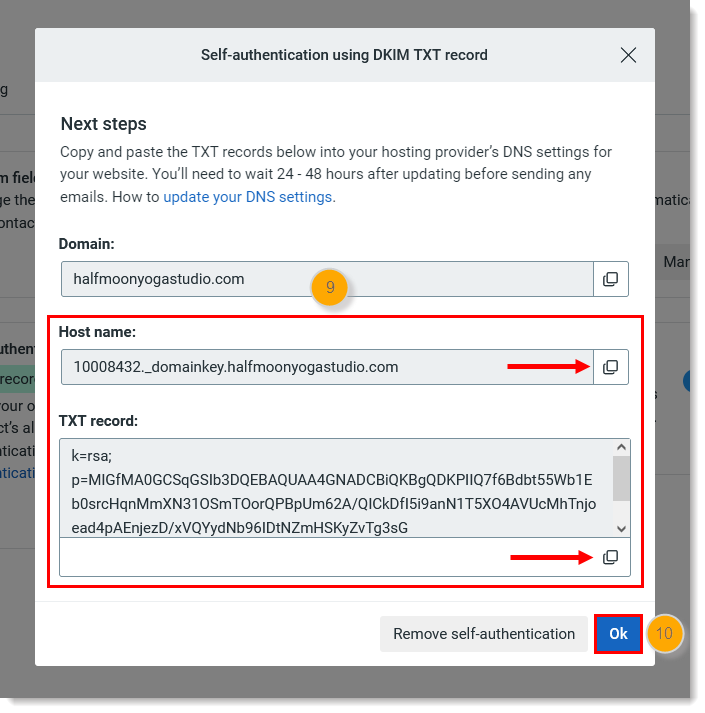
Note: If you send email from multiple locations, such as Constant Contact, Google apps, and a CRM tool, each location signs with a different private DKIM key. You will have multiple public keys on your DNS to correspond to the private keys. DKIM keys are differentiated by the selector; in the above example, the selector is 10008432. Constant Contact uses numbers for the selector, but that’s not always the case. For example, Google uses letters for the selector instead.
Reference: Constant Contact’s DKIM directions
A note on SPF
Constant Contact does not currently support using the customer’s domain in a way that achieves SPF alignment. This means it will not pass DMARC with SPF. When sending an email through Constant Contact with your own custom domain email address, email is able to be only DKIM aligned.
If you have a dmarcian account, it may take a few days to see these changes reflected in the dmarcian platform. You can look in the Detail Viewer (shown below) to check SPF and DKIM alignment required for DMARC.

With a team of email security experts and a mission of making email and the internet more trustworthy through domain security, dmarcian is here to help assess an organization’s domain catalog and implement and manage DMARC for the long haul.
Want to continue the conversation? Head over to the dmarcian Forum.


