Cisco ESA DMARC Configuration Guide
In this article, we present a guide on deploying DMARC on Cisco’s Email Security Appliance
(ESA).
If you believe that you already have your system’s DMARC authentication and reporting set up correctly, please take the time to read through the information and compare it to your current settings. These settings are industry best practices, and we encourage you to not diverge from them. Your ESA’s AsyncOS version should be 13+. If 14, it should be 14.0.2 or greater due to a bug in lower versions of 14.
NOTES:
- If you don’t set this up correctly, please don’t set it up at all. If it isn’t configured correctly, you’ll pollute valid data being sent from other sources, and your DMARC data may be blacklisted by aggregators.
- Varying settings from the recommendations in how or whether your environment performs SPF or DKIM verification will affect the ability of the system to perform adequate DMARC analysis and will also degrade (to the point of uselessness) the quality of any reporting data that the system sends.
- Altering the system DMARC enforcement action from what policy is determined for messages undermines work domain owners worldwide have invested to authenticate their traffic. If they have gone to the lengths necessary to check and fix authentication and publish a p=reject or p=quarantine policy, please adhere to that and allow your ESA to obey the result.
- If your domain(s) are not yet at p=reject or p=quarantine, enforcement settings on your ESA will not affect email with your domain in the From header. And by the time you DO want to apply those settings to your own DMARC record, you will want all environments to adhere to your policy. Participate in the global reporting+enforcement environment that you benefit from.
Results of Making These Changes
- Your ESA will correctly determine SPF and DKIM authentication results for inbound messages. There is no enforcement component to this, i.e., determining this result will not alter delivery results.
- There may be additional related logging in mail logs and additional useful information in headers of accepted messages.
- Your ESA will determine DMARC authentication results (relies on both SPF and DKIM authentication results) and enforce policy; this provides additional protection from spam and phishing.
- There may be additional related logging in mail logs and additional useful information in headers of accepted messages.
- If the domain for which DMARC authentication was checked has a p=reject DMARC policy and authentication failed, the message will be rejected during SMTP conversation as expected and requested by the domain owner.
- If the domain for which DMARC authentication was checked has a p=quarantine DMARC policy and authentication failed, the message will be quarantined to the policy quarantine on the ESA.
- If the domain for which DMARC authentication was checked has a p=none DMARC policy and authentication failed, no action will be taken on the message.
- Your ESA will generate and send DMARC RUA data to domain owners at addresses specified in their DMARC records. For example, if your ESA sees messages where gmail.com was present in the From header of messages, the ESA will generate an RUA report to the gmail.com reporting address, which currently happens to be the address [email protected].

Following is the order that this guide will have you visit and update. You can see these actions under the Mail Policies menu (see image to the left) in the ESA user interface:
- DKIM verification profile
- DMARC
- Mail Flow Policies
Verification Profiles
Technically, this should be “DKIM verification profiles,” since no one should be using “DomainKeys”—it was deprecated in 2007.
We suggest that you create, keep or change only the DEFAULT profile; you should not need any other. As mentioned earlier, DKIM verification by itself (configured this way) has no impact on message delivery.
Change, update or create the profile to match exactly the settings as shown in the following screenshot:

Verification Profiles – Notes
- Keys less than 1024 are known to be too weak for production use. Do not use or accept DKIM keys under this size.
- There are larger keys in use than 2048; it is a Cisco bug that the ESA cannot yet create or verify those larger keys.
- There are settings visible here that would allow the administrator to cause message rejections or delays solely based on DKIM results or failure to verify (due to DNS results). Do not use these.
DMARC Configuration
Unlike the prior section, there are some settings below that you will need to vary from the screenshot based on your unique environment. You can make your configuration look like the below and consult the guidance in the following sections for what you need to change for your own environment.
DMARC Configuration – Global Settings
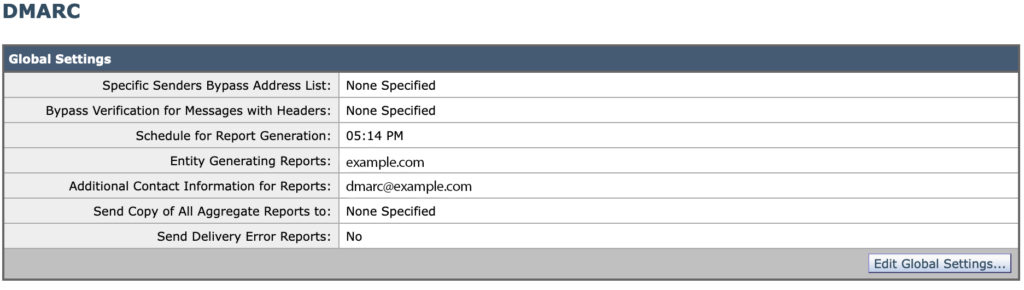
- Schedule: In order to comply fairly closely to RFC standards and recommendations, you need the scheduled report generation time to be around 15 minutes before the end of the day in UTC time. In other words, if you are in the USA on the East Coast, you’ll have a different setting than you would on the West Coast. Cisco has a bug on how poor this configuration item is, so ask them about it. It’s much more complicated than you think. The Cisco bug is CSCun35657.
- Entity: Your company or organization. This setting should be the same on all of your ESAs.
- Additional contact: This is populated into the XML data sent to domain owners. It should be a real address at your domain, but perhaps with stringent antispam+garbage collection settings. You should be able to receive feedback or questions from folks who analyze your system’s XML reports—this would be quite rare, but it does happen.
- Leave the other settings as shown in the screenshot.
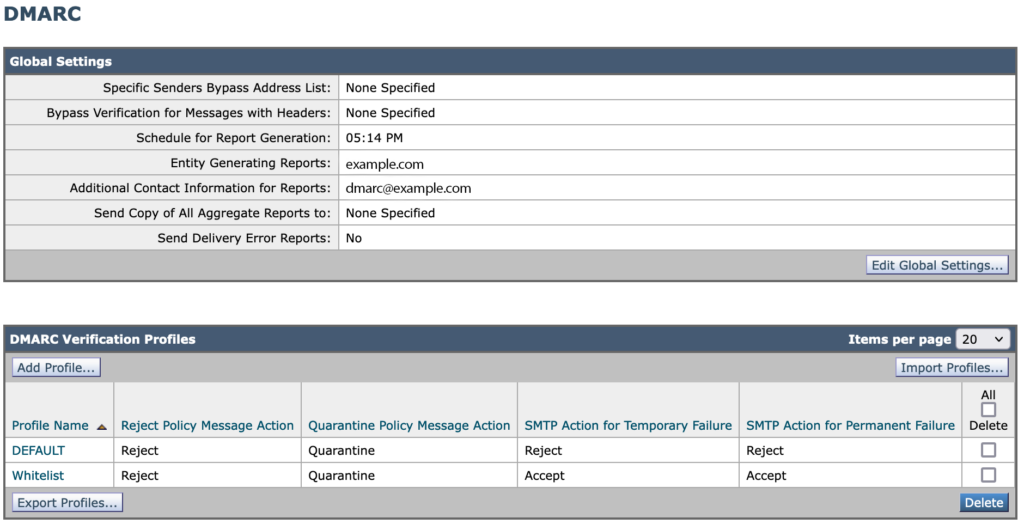
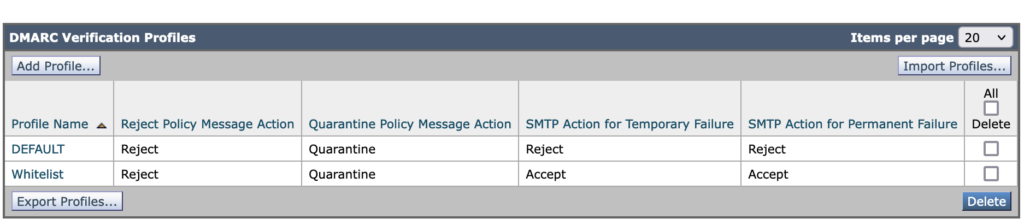
DMARC Configuration – Verification Profiles
Set up two profiles exactly as shown in the screenshot below.
Mail Flow Policies
The changes here will put the settings from the prior two sections to work. Following are the three steps:
- Update defaults
- Update Inbound policies to accept defaults
- Correct Outbound/Relay policies to override defaults
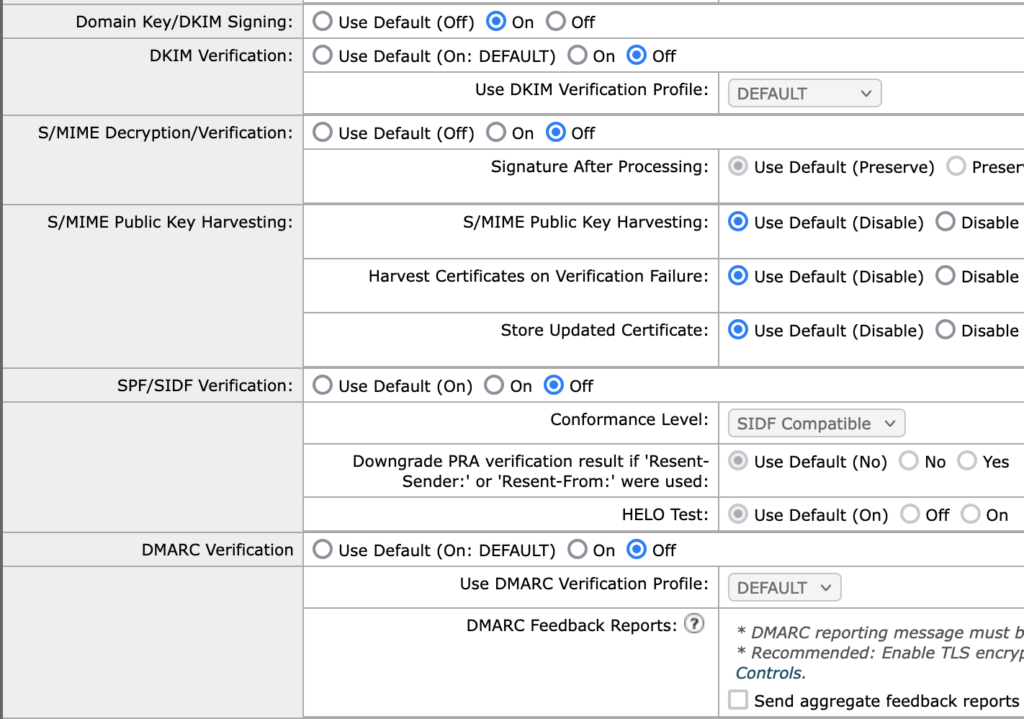
Mail Flow Policies – Update Defaults
Open your Default Policy Parameters, find the section that looks like the screenshot below, and make sure all the settings match. Aside from S/MIME (we’re not doing anything with that), if you have something else going on there, retain it.
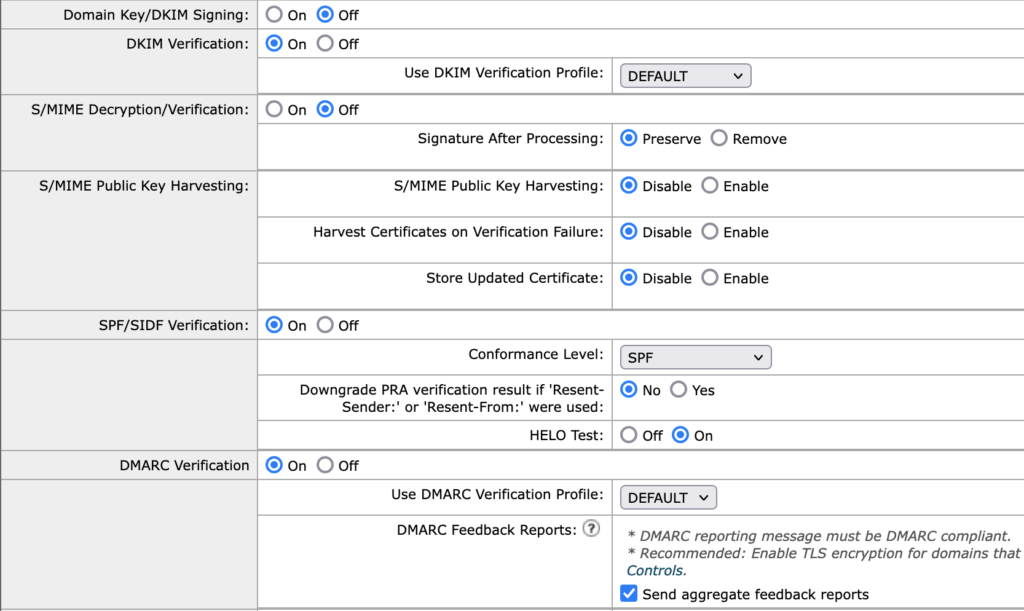
- DKIM signing: The default here is Off, with the assumption that most of the HAT policies and other MFPs on the system are relevant to inbound traffic. If your system isn’t set up to operate this way, many of these instructions are probably not for you, and you probably already understand how to vary this setup to work correctly. If not, ask for help.
- DKIM Verification: You want this to be On, and you want the profile to be the DEFAULT one we set up earlier.
- S/MIME: ignore
- SPF verification: On, and just with SPF conformance. Use the settings as shown.
- DMARC verification: This should be On. Use the verification profile DEFAULT. Send aggregate reports. Do not send reports if you have not followed all of the setup instructions which are relevant to authentication and enforcement.
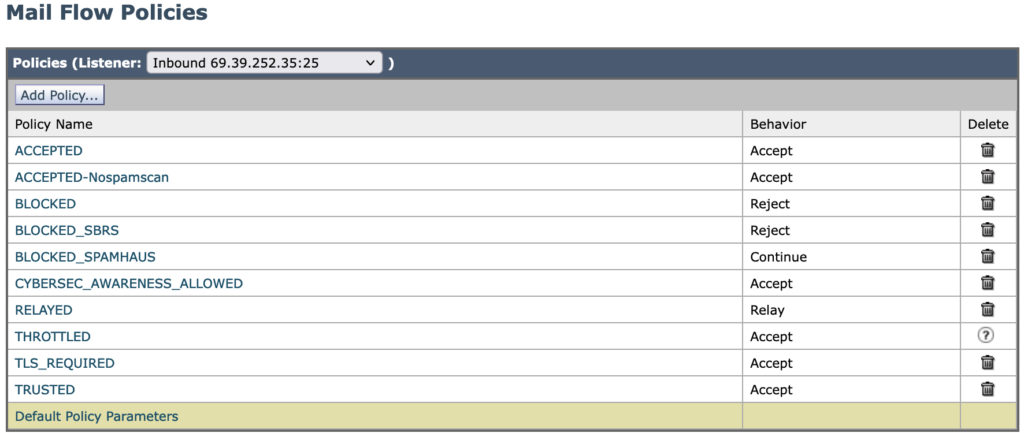
Now you need to go back to your overall list of Mail Flow Policies (such as below), and make sure of the following:
- Your inbound policies are accepting the default settings we just configured.
- Your outbound policies (these are usually Relay policies) have different behavior, generally the opposite of the inbound.
Mail Flow Policies – Update Inbound Policies
Update Inbound policies to accept defaults: For example, by checking on Accepted and the relevant section, you should see the following:
NOTE: All other non-relay policies should be the same.
Mail Flow Policies – Correct Outbound/Relay Policies
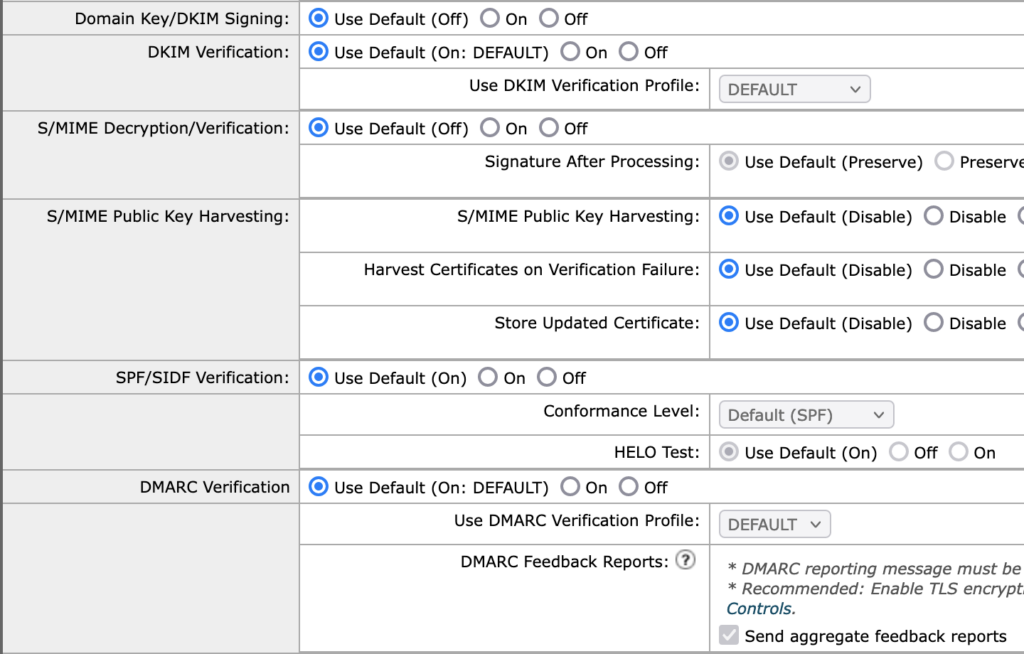
Correct Outbound/Relay policies to override defaults. When you check into the one Relay type policy, the settings should be made to look like the following:
- DKIM signing set as On here with the assumption that you do have DKIM signing already configured for outbound messages. If you don’t have that, leave the setting as Off, and consider working on outbound DKIM signing if appropriate from this ESA environment.
And now the last thing to do is to use the orange “Commit Changes” button.
If you have any questions about configuring DMARC on Cisco’s email security appliance, let us know.
We’re Here to Help
With a team of email security experts and a mission of making email and the internet more trustworthy through domain security, dmarcian is here to help assess an organization’s domain catalog and implement and manage DMARC for the long haul.