DKIM Selectors
This article takes a look at DKIM Selectors in particular, and we explain:
- What DKIM Selectors are
- Where to find your own DKIM Selector
- Third-Party providers and DKIM Signing
How does DKIM work?
DKIM (DomainKeys Identified Mail) is an email authentication method that allows an email receiver to check that an email that claimed to come from a specific domain was indeed authorized by the owner of that domain and received without any unauthorized modification to its content during transit. This is achieved through the use of cryptographic authentication with the use of a cryptographic key pair—a private key and a public key.
The Mechanics of DKIM
- Digital Signature Creation: When an email is sent, the originating email server generates a unique digital signature for the message. This signature is based on the content of the email itself, including headers and body, ensuring that any alteration of the email during transit can be detected. The signature is created using a private key known only to the sender’s domain.
- Adding the Signature: The digital signature is then added to the email as a header, known as the DKIM-Signature header. This header includes several pieces of critical information for the verification process, such as the DKIM version, the domain claiming responsibility for the email (d= tag), and the actual signature (b= tag).
- Email Transmission and Reception: Once the email is sent, it travels through the internet to reach the recipient’s email server. Along the way, it may pass through intermediary servers, each of which has the opportunity to inspect the DKIM signature if configured to do so. It is common for emails to be relayed through several servers. For instance, an organization may send an email from their Microsoft 365 account, relayed through a third-party security gateway before being delivered to the intended recipient. Automatically forwarded emails are also relayed, such as when someone with a university email address configures their mailbox to forward all incoming emails to their private Gmail account.
- Verification Process: Upon receiving the email, the recipient’s server extracts the DKIM-Signature header and uses the information within to perform a DNS query. This query looks up the public key published in the sender’s DNS records under the specific DKIM selector. The public key is then used to verify the digital signature added to the email.
- Authentication Check: If the signature matches the content of the email, it not only verifies the email’s authenticity but also ensures its integrity during transit. However, for the DKIM signature to be fully relevant in affirming the sender’s legitimacy, the signing domain specified in the DKIM-Signature header (the d= tag) must match the domain in the email’s “From” header. This alignment is critical because it ensures that the entity claiming responsibility for the email through DKIM is the same as the one indicated in the “From” address. Without this match, it would be possible for anyone to spoof the “From” header while signing the email with their own domain, undermining the trust mechanism intended by DKIM.
What are DKIM Selectors?
DKIM selectors enable the receiving email server to locate and validate the sender’s public key. A DKIM selector is essentially a method used to distinguish between multiple keys published in a single domain’s DNS records. This is particularly useful for organizations that send emails from multiple servers or services, allowing each to have its own unique DKIM signature.
How do I find my DKIM Selector?
Discovering your DKIM selector is a straightforward process that involves inspecting the headers of an email sent from your domain. Here’s how you can view these headers in two popular email clients, Gmail and Outlook. Keep in mind that these steps can vary depending on the version of your email clients, and that the steps will be different from one provider to another.
Finding your DKIM Selector in Gmail
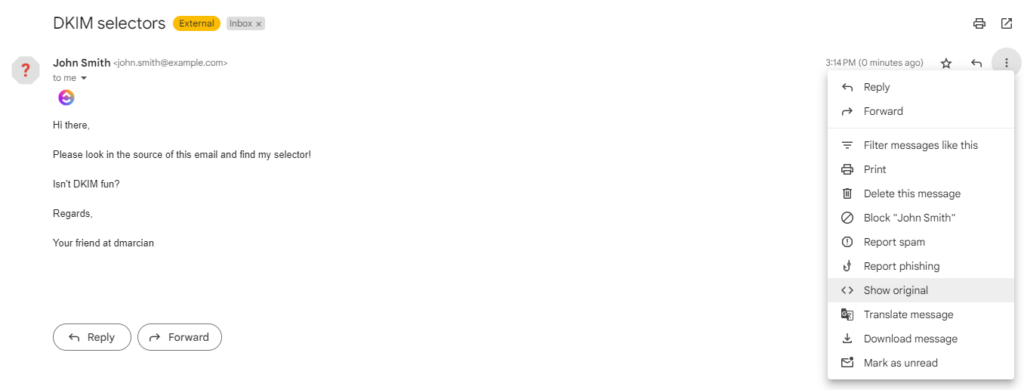
- Open the email in question.
- Click on the three dots in the top-right corner of the email window to open the menu.
- Select “Show original” from the dropdown menu.
- A new tab or window will open, displaying the full headers and original message. Scroll or use the search function (Ctrl+F or Cmd+F) to find the “DKIM-Signature” section.

Finding your DKIM Selector in Outlook
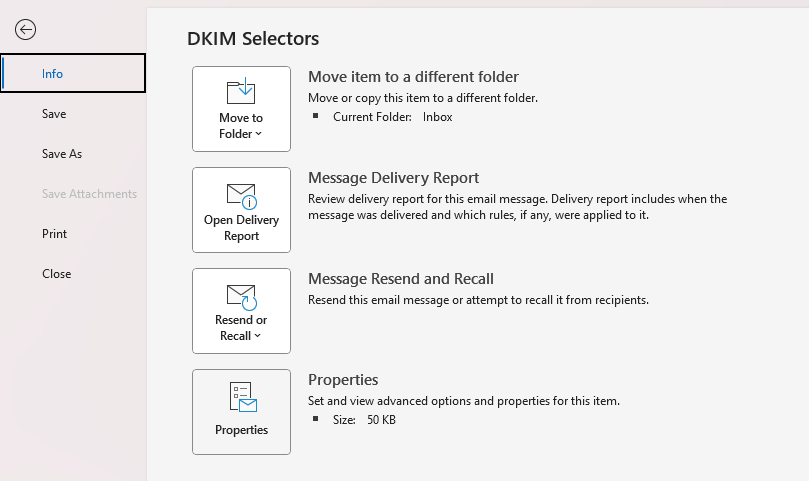
- Double-click the email to open it in a new window.
- Go to the “File” menu and select “Properties.”
- Under the “Internet headers” section in the Properties window, you’ll find the email headers. Scroll to locate the “DKIM-Signature” line.

Sample DKIM Signature Header
Suppose you’ve sent an email from example.com, and you’re now looking at the email’s headers. You might find a DKIM-Signature header that looks something like this:
DKIM-Signature: v=1; a=rsa-sha256; d=example.com; s=dkim1; c=relaxed/relaxed; …
In this fictitious example, the d=example.com part specifies the domain responsible for the email, and s=dkim1 is the selector. The selector dkim1 indicates where in the DNS records of example.com the public key can be found, specifically in a record at dkim1._domainkey.example.com.
Finding the Selector
In the DKIM-Signature header, the s= tag directly follows the domain (d= tag) and precedes other parameters. The value associated with this tag is your DKIM selector. In our example, dkim1 is the selector you’re looking for.
Next Steps
Once you’ve identified your DKIM selector, you can use it to verify your DKIM records, and look for it in your DMARC data to measure its use and to confirm it is working as expected. Tools like the DKIM Inspector or the DKIM validator can help you check that your public key is correctly published in your DNS and accessible for email verification purposes or verify that the public key record you are about to publish in DNS is syntactically accurate.
Third-Party Providers and DKIM Signing: TXT vs. CNAME Records
When integrating DKIM signing through a third-party email service provider, such as Microsoft Exchange Online or Salesforce.com, the provider may require you to add either a TXT record or a CNAME record to your domain’s DNS settings. This addition is necessary for verifying the emails sent on behalf of your domain using the provider’s DKIM signature.
Here’s an overview of why each type of record might be used and examples of what they may look like:
TXT Record for DKIM
Why: A TXT record is used to directly store the DKIM public key in your domain’s DNS. It allows email servers receiving your messages to find and use this public key to verify the DKIM signature of emails sent from your domain.
Example: If your third-party provider gives you a TXT record for DKIM, it might look something like this:
dkim1._domainkey.example.com. IN TXT “v=DKIM1; h=sha256; k=rsa; p=MIGfMA0GCSqGSIb3DQEBAQUAA4GNADCBiQKBgQD…
Here, dkim1 is the DKIM selector, and the p= part contains the public key.
CNAME Record for DKIM
Why: Some providers use a CNAME record to reference a DKIM public key hosted on their infrastructure. This approach allows the provider to rotate DKIM keys without requiring changes to the client’s DNS. It effectively delegates the lookup for the DKIM key to the provider’s domain.
Example: If your provider recommends using a CNAME record, it might look like this:
dkim1._domainkey.example.com. IN CNAME dkim1.exampleprovider.com.
In this case, querying dkim1._domainkey.example.com in DNS will return a CNAME record pointing to dkim1.exampleprovider.com, where the actual TXT record with the DKIM public key is hosted.
Choosing Between TXT and CNAME Records
The choice between TXT and CNAME records for DKIM depends on your provider’s infrastructure and their policy for managing DKIM keys. CNAME records can offer more flexibility for key management, especially for providers that handle key rotation on behalf of their clients. However, TXT records give domain owners direct control over their DKIM keys in their DNS.
Implementing Provider’s DKIM Records
Follow your provider’s instructions carefully when adding DKIM records to your DNS. Ensure that the records are correctly formatted and published, and verify their propagation using DNS lookup tools. A service provider will often have a tool of their own, or even require that the record be verified within their application or by their support team before enabling the use of the key.
Remember to update these records as advised by your provider, especially if they use TXT records for DKIM and periodically rotate keys.
We’re Here to Help
With a team of email security experts and a mission of making email and the internet more trustworthy through domain security, dmarcian is here to help assess an organization’s domain catalog and implement and manage DMARC for the long haul.
Want to continue the conversation? Head over to the dmarcian Forum.


